Note from Hint Mama: My nearly 2-year-old daughter is fascinated by airplanes, trucks and trains (in addition to baby dolls). In fact, I have a feeling that she’ll be asking for her own train table before long. However, store-bought train tables aren’t cheap and can run $100 or more, so I’m in the market for inexpensive alternatives like those Susan Maccarelli writes about in today’s hint. Susan, a stay-at-home mom to two toddlers, ages 2 and 3, blogs at Pecked To Death By Chickens, runs the site Wooden Train Set Reviews (so she knows her train tables) and is a new Hint Mama contributor.
If you have a little train fanatic at home, you may be contemplating a train table. Unfortunately, store-bought models aren’t always a good fit for our homes due to either price or space limitations.
I know this first hand. With a 2.5-year-old son and an almost 4-year-old daughter who both love trains, I’ve spent a lot of time researching train tables (in fact, I even started a review site devoted to the subject). And of course, the models on the market that I like best are very expensive, especially when you consider that a train table is only likely to be used for a few years.
So, rather than buy a store-bought model, I decided to get creative and try a little DIY magic. My easy (only 10-minutes of prep time required) DIY train table is today’s hint.
We don’t have a dedicated playroom, and I don’t like the idea of putting a train table in the middle of our living room. So, I knew I wanted train tables that would go into my children’s bedrooms, and the solution came to me when my daughter graduated to a big girl bed last August.
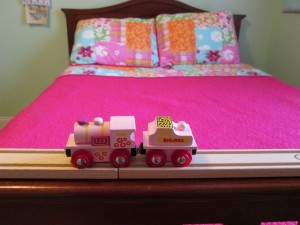 My solution: I created a train table of sorts right on my daughter’s bed by attaching train tracks to the bed’s footboard, and when I say anyone can do this, I mean ANYONE (including possibly the blindfolded) – it’s that simple of a project.
Like this idea? Here’s how to make your own bed train table. What you’ll need:
1. A bed with a flat surface to adhere your rail to. This project requires that either the headboard or footboard of your bed be flat. It could also work on a crib or toddler bed with a headboard, footboard or sideboard. Ideally, the bed’s flat surface will be as wide, or wider, than a standard wooden train track.
2. Flat track to run the length of the bed’s flat surface. If the track isn’t exactly the same size as the bed’s flat surface, this isn’t a problem (our track was a little shy of the footboard’s full length). Just measure the flat surface and obtain a track (or two) that can cover that length. I used some inexpensive track from Amazon.com that wasn’t double-sided (this means cheaper!), which was fine since I adhered the track to the bed.
3. Adhesive. I used Command Medium Refill Strips, which we happened to have around the house.
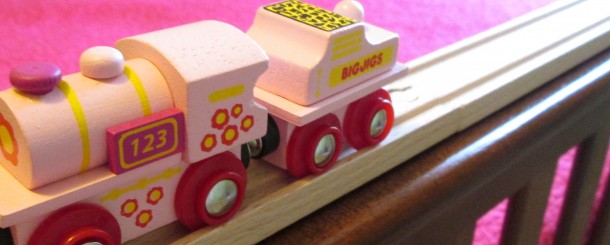
Once you have all the parts ready, the next step is to affix one Command Strip to each track, and then attach the track to the bed’s flat surface. Then, add your favorite train(s) and you are off and running! I used a neat “girly” train from Bigjigs because it fit well with the other pink decor in my daughter’s room.
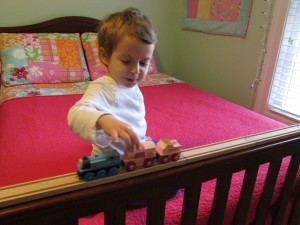 As I mention above, this train table took about 10 minutes (at most) to create, and it has been a hit with both my daughter and son. My son, who is still in a toddler bed, loves to climb into his sister’s “big girl bed” and play trains.
To be sure, my solution is a pretty simple train table. It’s a basic straight track and doesn’t provide the complexity of a curved track, though you could spice this design up a little with a bridge or tunnel.
You also may be wondering whether the adhesive could damage your furniture. I’ve never had a problem removing the strips from surfaces, but you may want to do a test run on a less visible part of the bed to ensure that the strips remove to your liking. In addition, I left the pull tab end of each Command Strip visible at the end of each track in case I want to remove them later.
And as for whether a bedroom train table will keep the kids up at night, we’ve always had a policy in our home that our kids can read or play quietly in bed before going to sleep if they want. So, the train table provides some quiet entertainment for our daughter at naptime, bedtime and when she first wakes up in the morning. In fact, part of the reason I made the table in the first place was because my daughter was an early riser, so I was trying to give her things that would entertain her for a while in the morning when she first woke up, so she would stay in bed a little longer and let me sleep!
But use your own judgment. If you think this solution might be too distracting for your children at bedtime, if you’re worried about attaching tracks directly to your furniture or if you don’t have a bed with a flat surface, there are other easy DIY train table approaches you can try.
One such idea: you could buy a relatively inexpensive rug or floor mat that comes with roads and tracks printed on it or that you can decorate with such images, and use that as a train “table.” (Tape works great for easily setting up a train track on a rug, as Rookie Mom Whitney Moss has pointed out).
In other words, you don’t have to have an actual train table and tracks to have loads of fun with wooden trains! In my son’s room, for instance, I created a train table of sorts on a flat laminate particleboard from an old and cheap desk we were throwing out, and I used some felt adhesive to give the surface a bit of a landscaped look. This square “ train table” can easily be stored under his toddler bed and pulled out whenever we want to play with it.
What do you think of my DIY train tables? What are your tricks for saving money on train tables?
Susan Maccarelli is a temporarily-retired sales and account management professional who has been a stay at home mom since 2010. As mom to 2 toddlers, wife to a work-from-home husband and executive director of the Maccarelli family meals, activities, cleaning, laundry, shopping, real estate endeavors, travel and general errands, she derives constant inspiration for her blog, Pecked To Death By Chickens, from the little annoyances that pop up daily as she tries to keep an eye on all the moving parts. Her posts have been featured on BlogHer, Project Underblog and BonBon Break, and she is also the founder of the site Wooden Train Set Reviews. Susan enjoys travel, reading, cooking and talking about herself in the third person. Follow Susan on Facebook, Twitter and Google+.
Follow Hint Mama on Facebook and Twitter, and read more about her and her disclosures.

AH! We were JUST talking last night about making a train table for Weston’s first birthday! This is great!
We got our first train table because there was an awesome deal at Target. The next (2 train fanatics, 2 tables – we’re crazy) we found at a garage sale. I like the DIY idea, honestly.
I definitely like the ones that can convert to an art table or something if the child outgrows their train interest. Garage sale-ing for train tables is a great idea too. I imagine they go fast!
Very cute idea! My middle child was a (very) early riser – wish I’d known about this idea back when he was little!